I don’t know about everyone else but I remember getting so excited for Valentines Day when I was a kid. I got to pick out what Valentines I wanted for my class, put them together/personalize them and then feel pure joy when it came time to hand them out.
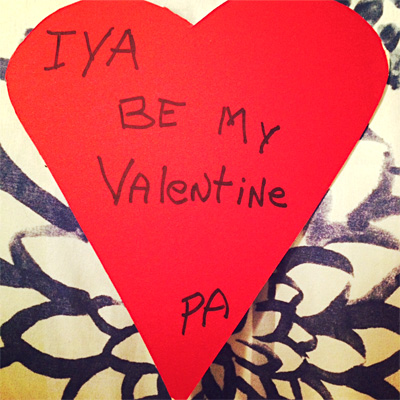
I haven’t really celebrated Valentines Day much since then and I thought with the way the last year has been, any little piece of happiness I can bring someone is worth taking the time to do. My someone is my grandma, or as I call her, Iya.
Her and my Pa were married for over 50 years when he passed but when he was here he always made sure to get her something for the holiday. Even when he was no longer able to drive and leave the house, he would make her something to show his love for her.
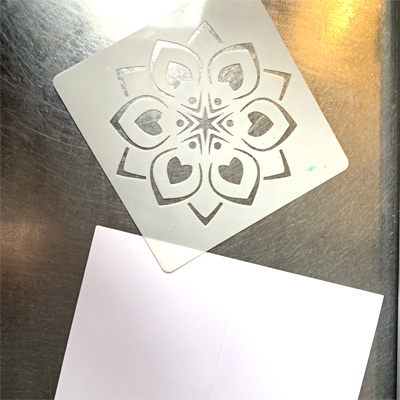
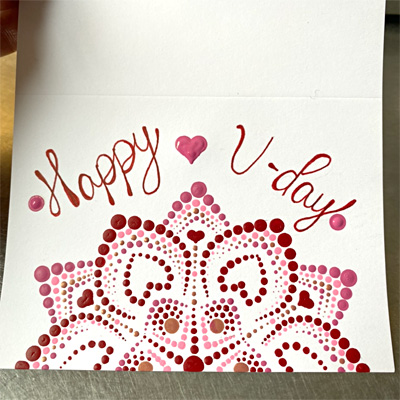
She was the first person I thought of that could use a pick me up and who doesn’t love getting something in the mail that’s not a bill? I started by using a stencil I already had from a dot mandala kit I ordered on Amazon. I also had some blank cards Anne had given me a few months ago during the first shutdown.
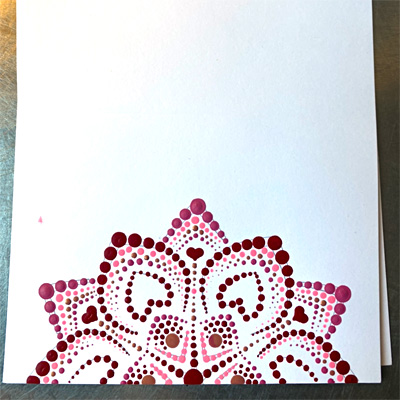
I placed it so it was kind of peaking up from the bottom of the card and traced it in pencil. For the colors I used the classic Valentine’s Day colors: red and multiple shades of pink. I even added a few random hearts all thanks to my experience as a nail tech. You’ll also notice my oops I had with getting paint in an area it wasn’t suppose to be (urgh).
This is the part of the project that I am NOT skilled in. Lettering is one of those things I’ve tried a million times and have never gotten any good at. Either way, I wanted it all to be handmade and I knew my Iya would love it no matter what.
This only took me about an hour with dry time and I highly recommend these stencils(link below). At the very end I lightly took an eraser to get rid of any exposed marks, just don’t be too aggressive. Hand making something for someone not only brings a smile to their face, but it also makes you feel good and let’s be real, we could use allllll the good feels right now.
It all started with Tiktok. Like a lot of other millennials I know, I resisted Tiktok for quite a while. “I don’t watch videos on my phone!” I thought. But then the pandemic hit and I found myself bored in my house wondering what all the hype was about. So, after a night of whiskey and boredom, I downloaded the app, liked a few videos, and decided that it was fun enough to fill the time, but no big deal. Aaaaaand then I got hooked. Now I am always browsing Tiktok, and it’s been a source of a lot of my ideas- and impulse buys.
See, my Tiktok For You Page is sneaky and insidious. I can see a new hobby on there once and be intrigued, but able to resist. It’s only after I see the thirtieth video of people doing super awesome things with their new shinies that I decide that I absolutely HAVE TO TRY IT RIGHT NOW. That’s what happened with embroidery. I saw all these cool Tiktoks of people making amazing embroidered artworks and I decided that because I love embroidered clothes and spend a lot of money on sweaters with cheap appliques on them, that somehow learning embroidery would SAVE me money in the long run. And this is where you learn that I am the world’s biggest sucker.
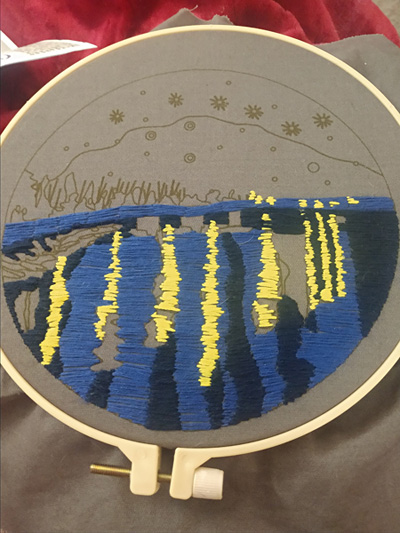
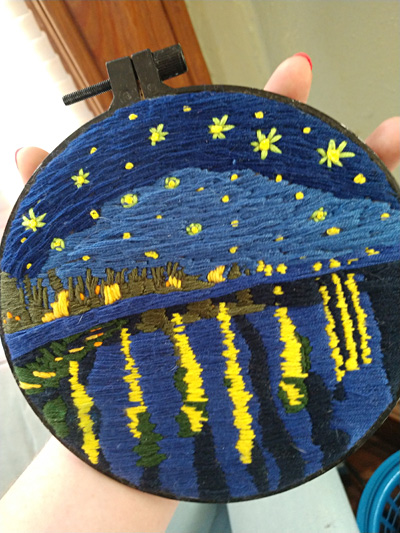
It even came with a cute Van Gogh-esque sunflower design!
The design reminded me of a fond memory of a vacation I took to a lakeside cabin, where my friends and I sat on a dock and watched the lights of all the vacation homes reflecting on the water.
It was a massive 2’ by 3’ (yes, I used the right measurement designations there) design of an ethereal woman looking at the moon. I saw it and needed to make it. I hadn’t cross stitched in years. My penchant for being a mess usually meant that any attempts at cross stitch ended in tangled threads and disappointment, so I’d abandoned the hobby after making a few small projects. But still, the moon girl taunted me. “I could do it,” I thought. “It will be a nice mindless project for when I’m talking with friends or watching TV. Who cares that it will take a long time?” Finally, after debating for several days, I added the kit to my cart and bought that too.
The embroidery kit was the first to arrive. I tore into it with all of the enthusiasm of a toddler at Christmas, and in no time had the preprinted fabric set up in a hoop, ready for me to stab it repeatedly. Has anyone else noticed how many crafting hobbies involve stabbing? Just me? Okay. That clearly doesn’t say anything about my psyche at all.
I settled in to learn how to embroider and discovered that in my rush to get a relatively inexpensive kit, I’d purchased a kit with vague, badly translated instructions, and stitch diagrams that had clearly been stolen from far flung corners of the internet to be printed in low quality on the piece of printer paper that the instructions were on. The kit I’d bought to ease myself into embroidery was turning out to be more of a trial by fire. Still, I powered through it, and I really enjoyed it!
Embroidery felt in a strange way like I was connecting with my ancestors. I could imagine myself as the heroine in my favorite Regency era romance, stitching away as I exchanged clever banter with an interesting suitor… Meanwhile, the embroidery was finished in two days, and turned out pretty good, considering how little I knew about embroidery to begin with.
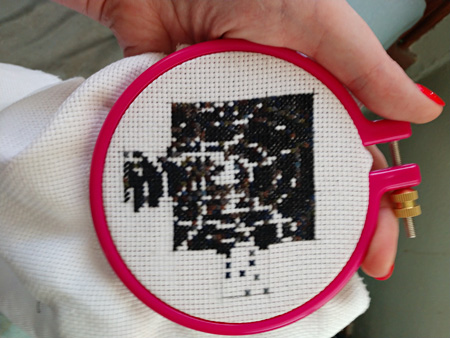
As if by design, the cross stitch kit arrived the day I finished my little embroidery. The whole thing made me laugh. The canvas was the size of a baby blanket. The collection of embroidery thread was large and thick enough to be a makeshift wig. The pattern was a BOOK. My sibling, an avid cross stitcher, looked at it all and told me that I was fucking insane.
Regular sized round palette for scale
I’ll be honest, I agree. It’s going to be a crazy undertaking that will probably take years, and that’s if I don’t lose interest and put it away for a while. I’ve already been working on it for longer than it took to finish my embroidery design, and I haven’t even been able to finish a 30 stitch by 30 stitch square. But, I’m also excited to see it slowly start to come together, and I may share my progress here as I go.
So many shades of off-black
This week has been a week of hobbies old and hobbies new. It’s been a good reminder to keep an open mind, because I never know what will call to me, and when. It’s also been a good reminder that sometimes you just have to stab something. And also that I’m fucking nuts.
With the exception of Jeff Bezos, 2020 was a pretty crappy year for everyone, right?
Personally though, I like to be a trend setter, so my crap-tastic year started a little before most when my husband unexpectedly lost his job in January.
February was filled with some family conflict that’s somewhat expected when five people live in a house together, and some of them have a genetic predisposition to anxiety disorders. One of them being the queen of anxiety and the benefactor of the aforementioned genes.
March was when lockdown hit, my husband was still unemployed and now so was I, along with all of my employees who were looking to me for reassurance that I could barely muster.
Then came April…
April was the crappiest of the tastic. My dad died.
He was diagnosed with a slow moving lymphoma in 2010, but it was being managed quite well with treatment. So I’ve known for a while that my time with him was limited, and I thought I was prepared, but it turns out you really can’t be prepared to lose someone who was such a big part of your life. On March 30th he was admitted to the hospital, and by April 10th he was gone.
We were luckier than a lot of families who lost someone this year. Because he didn’t have covid, he was moved to a hospice facility where we were all allowed to see him briefly before he died. Still, the trauma of those weeks continues to be a very raw and open wound. I had never had a panic attack before March 30th, now they are an intimate companion to my anxiety disorder.
In May, the legislators in my state decided to sue the governor to lift the lockdown orders. In a ruling that still makes me roll my eyes so far back into my head that I can see my brain, they won. By that time, we had learned just how dangerous this virus could be to two of the members of my immediate family. I had a decision to make for my business, and I chose to shield my already broken heart from more grief. I kept my business closed.
As you can imagine, in our current political climate, this decision was unpopular with a significant portion of the general public. I have never had so many people whom I legitimately loved, show me in no uncertain terms that they didn’t give a shit about me, my family, or the significant grief I was already experiencing. I literally don’t have enough fingers and toes to count them on. When I would point out that my husband has a better chance of dying from covid than surviving it, I was told I needed to stop living in fear.
Listen Linda, I know fear; I manage it on a daily basis. Choosing not to risk my family was not a decision based in fear. It was based on love and simple economics. Your $35 manicure is certainly not going to replace my husband’s salary if he dies, it won’t even pay for his ICU stay if he survives.
I was so mad (I still am), and for the first time in a very long time the anxiety filter in my brain, the one that keeps the nasty stuff from spilling out of my mouth for fear of confrontation, was dormant. I had words with people, many of them four letter, and most of them extremely uncomplimentary.
At this point the months started blending together, but around this time, Sketchyville was starting to solidify as a concept. I had already pulled my employees off of unemployment, and was paying them a salary even though we weren’t working. I figured I might as well leverage our downtime into something new. Most of all, I wanted to give us all something to focus on that wasn’t a news headline. I bought some equipment and supplies; including a case of dollar store boxes that I handed out to the girls telling them to make something they could put up on the Sketchyville page.
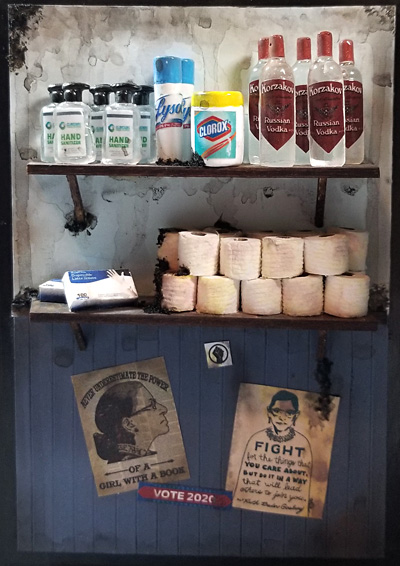
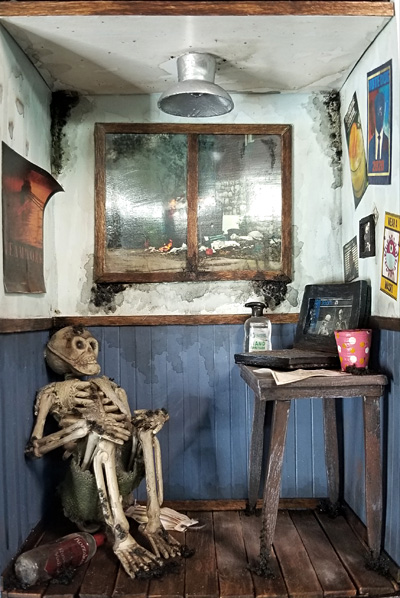
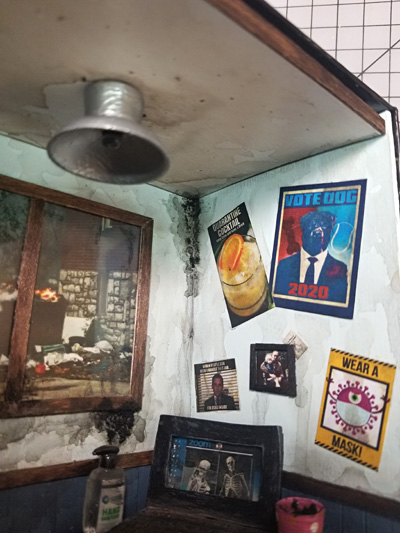
I decided I was going to put 2020 in my box. I started work on a diorama to encapsulate the year, good and bad. I tried to take everything that happened, and represent it in some form in my little box of trauma. There’s a picture of me and my dad with a memorial card, that was never made for his socially distanced funeral, tucked behind the frame. There’s the never-ending Zoom call, with a motivational "teamwork" poster visible in the background so your boss thinks you actually care. Behind the screen, where coworkers can’t see, there are memes and quarantine cocktail posters.
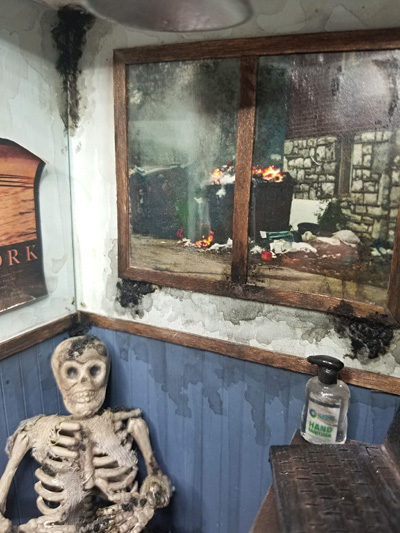
The dumpster fire in the alley casts a dystopian glow on the desk where a long forgotten cup of coffee grows mold next to an absentee ballot.
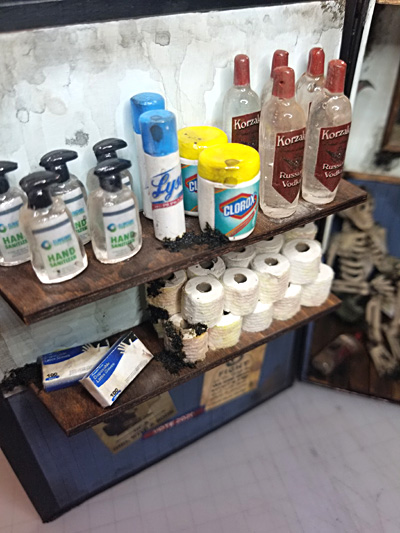
The door to the room holds the covid hoard. We managed to score a bunch of toilet paper, some gloves and disinfectants. Not to mention the vodka… We were going to need so much vodka...
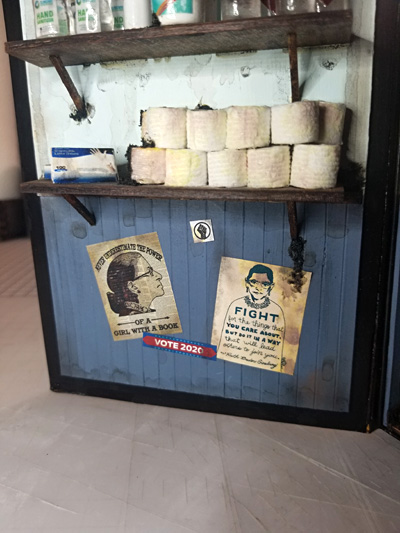
Under the stash, are some Notorious RBG posters, as well as stickers reminding us of the movements that came to the forefront over the summer.
Lastly, curled up in a fetal position on the floor is our conquered hero. He died forgotten, fruitlessly trying to protect the people he loved by isolating, while they went bar hopping confident the pandemic was a hoax. A vodka bottle and broken mask are his only companions while the world burned around him.
I know; maudlin, right? I have a black sense of humor, and 2020 didn’t really do anything to help that condition. Add in some hefty self-pity, and there you go.
A weird thing happened though, when I closed the box for the final video…
As I swung the lid closed, thinking it would be a great final shot, my fingers lingered. I was putting it all away. All of the anger, the tears I’ve cried in the shower, and the panic attacks I’ve muddled through, went into the making of the box. I could take it out to look at whenever I wanted, but I didn’t need to carry it with me anymore. It was finished; I could put it on a shelf and move on.
I’ve always said that crafting is my therapy, but I’ve never felt it more profoundly than in that moment.
If you’re feeling as traumatized by last year as I am, I encourage you to make your own 2020 project. It doesn’t have to be a diorama; it can be a sketch, a painting, a sculpture, or a poem. Do something though; don’t carry that shit around with you one minute more than you have to. Get it out of your brain, put it on a shelf, and revisit it from time to time on your own terms.
It’s been a crappy year for all of us, except maybe Jeff Bezos, and it’s time for us to heal.
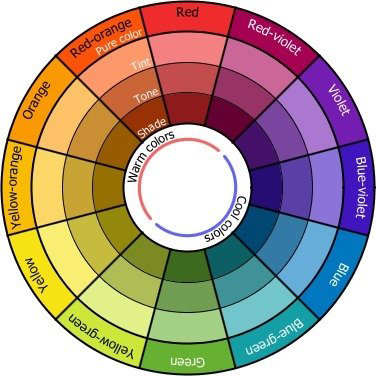
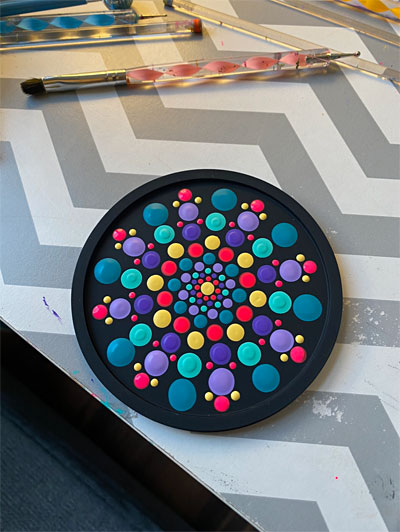
So you’ve decided to try out doing dot mandalas for yourself. You’ve got all of the tools, paints and whatever you choose to do your mandala on. Now what? First things first, you’re going to need to pick your color palette.
This is my favorite and also the hardest part when it comes to doing a new project. You can choose as many colors as you want really, and even as little as two. Personally, I go anywhere from 6-8 colors depending on my mood that day. If you’re not 100% sure how to pick colors that compliment each other, use a trusty color wheel to help you visualize what colors will go together best.
Something that helps me is picking three base colors and then doing two different shades of that color. In the image below you can see I chose two different shades of orange, teal, and purple. I feel like having multiple shades of the same color really adds depth and draws the eye in.
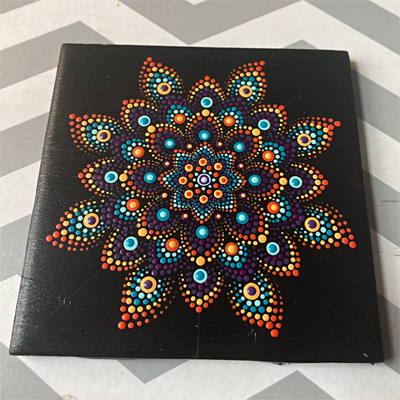
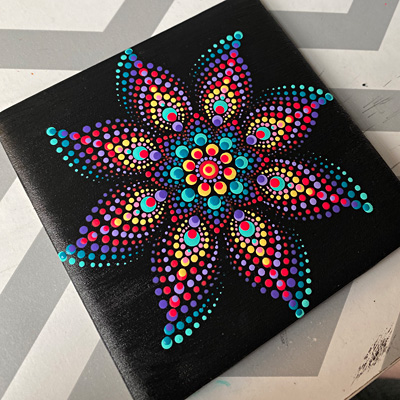
If you want to use more than eight colors that’s completely your prerogative! You can do all different colors, add a metallic highlight color for some sparkle, or even just use black and white layered on top of each other. In the picture below you can see I used seven different colors over black to really make the colors pop.
When it comes to choosing your color palette don’t be intimidated! Start with your favorite color and build from there, you got this! Play around, experiment, and if you do tag us on Instagram or Facebook!
I’m the type of person who loves clutter, so much so that minimalist rooms weird me out. While I can understand why someone would like the classic simplicity of a sparsely decorated space, I like to fill each and every surface in my room with art, gifts from friends, and silly little tchotchkes that make me smile.
The problem is that a lot of those tchotchkes are terribly painted, and, let's be realistic, machine painting is a far cry from what most people can paint. And I mean it when I said “most people” and not “most artists.” Many statuettes and figures can be improved with even a basic repaint.
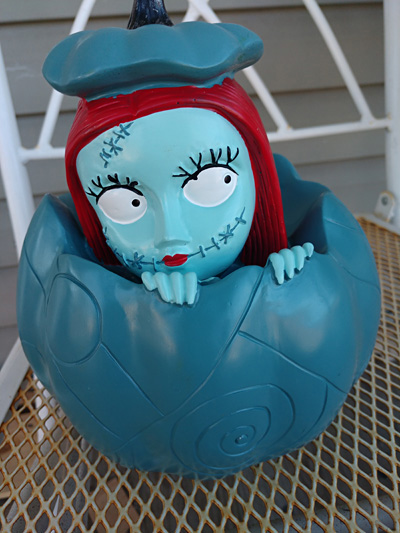
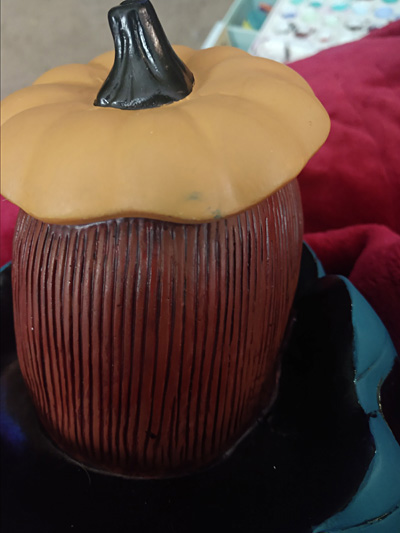
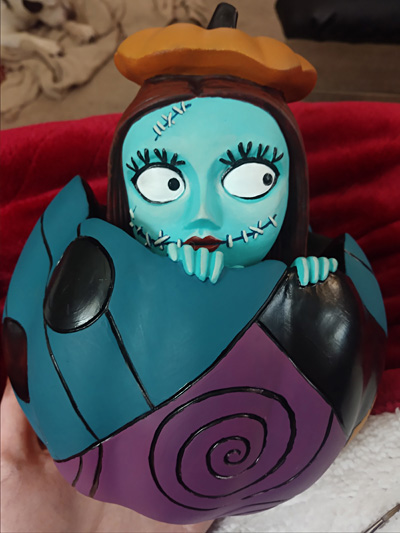
This week I was dealing with a nasty headache that made me want to avoid working on digital art. Squinting at minis also seemed like a bad idea, but I still wanted to do something to keep from getting too restless. So I went to my box of things to paint (mostly thrift store items that I’m sure will be making an appearance here eventually) and picked out the biggest item in the box: a statuette of Sally from Nightmare Before Christmas. She was an impulse buy from Halloween, when I saw her and knew that I needed to paint her. She had an unimaginative factory paint and cost somewhere around $10.
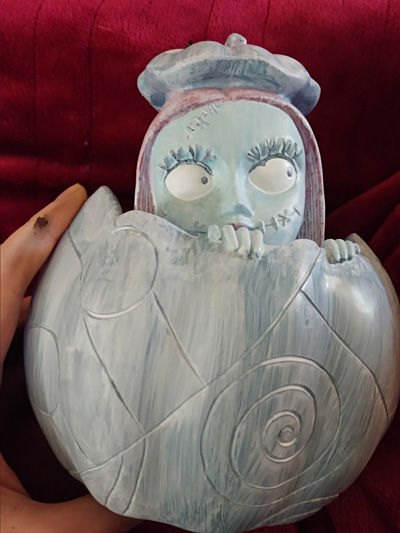
For me, the trickiest part of any repaint is figuring out how to deal with the existing paint, and I don’t know if there’s a cut and dry answer for how to tell what is the best course short of following my gut. Depending on the piece, I will either soak it in Simple Green (a household cleaning product used by many miniature painters to remove paint from a figure without damaging it), or just prime over the paint and hope that it sticks. The trick is that some figures are painted with materials that won’t soak off in Simple Green, and some figures will resist being painted if their surface hasn’t been sanded or stripped. Looking at this paint, I was concerned that it fell into the first category. The “paint” seemed awfully thick and shiny, which made me suspicious. So, I took the easy route and just painted over the whole thing with primer (in my case, white Stynylrez). And it worked (thankfully)!
The benefit of this was that I could still see a bit of paint shining through. Since I wasn’t planning to radically change most of the colors, this worked in my benefit. If you do plan on radically changing colors in your pieces, you may want to add a couple extra layers of primer, or use colored primers to prepaint your piece. It will save you paint down the line.
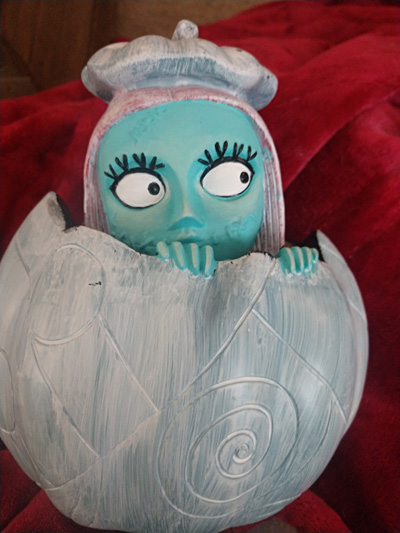
Now it was time to paint! When working on a three dimensional piece, I always work on the innermost sections of color first. This keeps me from smudging paint all over the areas I’ve already painted. I’m a bit of a messy painter, so this saves me frustration and makes it so that my hand doesn’t have to be *quite* as steady, which is good, because my hands naturally have a slight shake. I have a very hard time pulling straight, smooth lines in my art, so I take a lot of steps to keep from having to rely on a steady hand when I’m making things. I started with the inner parts of the pumpkin, which I just painted black. Next, I worked on the skin and eyes.
I base coated the skin first, and then worked on the eyes. I find it’s easier to paint the eyes before finishing the skin so that I can use the skin color to fix up any mistakes on the edges of the eye/eye makeup without having to redo the whole skin. On smaller figures I paint the entire eye sockets in with black first, but since the eyes on this statuette were so big, I painted the eye white, then lined it with the black, then used the skin tone and the white to clean up the edges of the eye liner. The pupil was sculpted in so I just had to paint where the ridge was, and the eyes were done, aside from some minor tweaks as I was painting the rest of the face.
I got a little fancier with the skin and used some techniques I learned from painting miniature to give her a bit of highlight and contour. Usually, when painting, I like to base coat with my midtones, then paint my highlights followed by my shadows, but on Sally, I had accidentally basecoated the skin with the shadow color. So instead of painting over it all again, I painted everything that wasn’t a shadow in the midtone. This sculpt made it so that I was able to do this with a minimum of blending needed, thankfully. Then, I thinned my highlight colors with glaze medium and worked in the highlights on her inner eye socket, cheekbones, nose, and mid forehead area. On larger smooth areas, like her cheeks and forehead, I worked back and forth between the midtone and highlight color to wet blend the edges where they would meet. If this all sounds intimidating, that’s okay! You can play with more graphic styles of painting or keep things simple and I promise it will still be an improvement on the factory paint. And, if worst comes to worst, you can always strip the paint and try again, or just paint over the areas you don’t like. That’s why I like acrylic paint so much- nothing is permanent unless you want it to be.
Once the skin was done, it was time to paint in her details. After looking at stills from The Nightmare Before Christmas, I figured it would be best to paint the stitches with some stark highlights. I painted in the recessed parts of the stitches first with a dark blue, then used the same dark blue to paint the raised stitches. To finish them off, I used a green toned off-white to paint highlight lines on the left side of the raised stitches (I chose the left side arbitrarily as the side that would get the light. I usually pick the left as a knee jerk reaction).
The hair was a little too finely detailed for me to do a clean paint on it, so I used some “tricks,” which worked out really well! I painted my base coat color on, then once that was dry I mixed a warm dark purpley wash (basically I mixed a lot of water with my paint until I got the consistency I wanted). I painted the wash over all of the outward facing parts of the hair, applying a little bit of water to the highest points afterwards. This lightens the wash in these areas, leaving them slightly lighter. I painted the pieces of hair that were near her face entirely with the darker color (not a wash!), since those sections would be in shadow anyway. Once the wash was dry, I used a cinnamony red color and lightly sidebrushed the areas that I wanted to be lighter (the front edges and the higher areas of her crown).
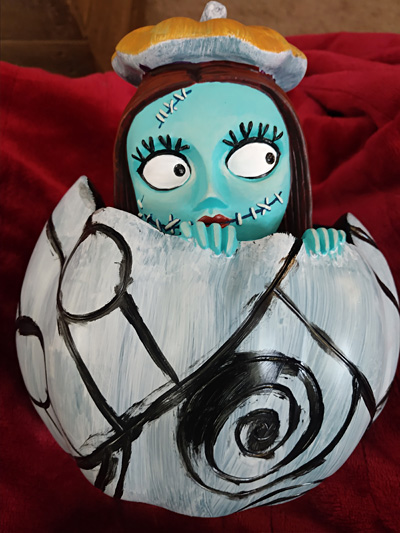
Lastly, it was time to paint the pumpkin. This was the simplest and yet most time consuming part of the paint job. I decided to paint the pumpkin in the colors of Sally’s dress with black outlines. I tried to save myself some effort by roughly painting in the black first. Then I started working on painting in the colors- green-blue, purple, orange, and black. It seemed to take fifty coats per color, but it was probably closer to 4 coats each, give or take (black took less because black is usually opaque, and orange took more because orange hates me. Jk, orange and yellow paints are just rarely opaque, in my experience).
Once the colors were in, I had to go back and redo most of the black outlines, because I was messy with my color coats. I’m glad I prepainted the black, as this step would have been much more difficult if I hadn’t, but I still had to paint in most of the outlines manually. Remember how I said I like to avoid painting lines? Yup. That was fun. If you end up in the same situation, move slowly, and be very careful to only work one side at a time to avoid smudging the paint. I made my life more difficult several times because I got too ambitious and tried to move to the next section too quickly.
Dangit
And finally, she was done! I sealed her with Testor’s Dull Cote to give her a matte effect and keep her paint from chipping. The paint job seems to be holding up well, and I don’t plan on putting her outside, so my lazy approach to prep work seems to have worked, for this statuette at least.
Overall, this whole project took about a day, and would have taken less time if I hadn’t gotten so ambitious. I’m pretty happy with her, and I think she fits the potential I saw in the figure when I saw it at Walgreens. So, next time you see a figure that isn’t living up to its potential, consider repainting it yourself. Instead of a boring factory paint, you’ll end up with a unique work of art that’s all your own.
As I was compiling all of my photos and links together for the blog today, I realized that I have a huge post for a project that only took me about three hours with dry time. In fact, I’ve already worked longer to create this post than I did to make the project. The reason it’s so huge is because it requires some back story, so bear with me.
A while back I was starting to learn some dollhouse design, so I purchased a few digital dollhouse files to see how other people were doing it. In order to learn the construction part of the design, I needed to actually make one, but I am not a carpenter and this was before I had purchased the laser cutter. The only cutting machine I had at my disposal was a Cricut Maker, which has a maximum cutting size of 12x24 inches. So I scaled the file down from an inch scale house to quarter scale.
Now, if you know nothing about scale, this is the cliff notes version… Inch scale (or 1:12 scale) means that something that is a foot wide in real life is an inch wide in scale. So if you have a four foot wide dresser, it would be four inches wide in your dollhouse. Quarter scale (or 1:48 scale) means that if it’s an inch wide in real life, it’s a quarter inch in your dollhouse. So your four foot dresser is now an inch. Got it?
I cut the scaled-down house out of matboard and put it together. It turned out really cute, so cute that I had a delusional moment, and thought it would be really fun to completely finish the house and give it to Lexi as a way to display some of her miniatures. I talked to Lexi about it, and we decided that it would be a great project for us to collaborate on, and my fate was sealed.
Don’t misinterpret me here. I’m not delusional for wanting to do a project with Lexi. If you haven’t read our bios, Lexi is my oldest kid, and I absolutely love her to death. We’ve worked together at the nail salon for six or more years now, and have managed to balance a work and family relationship much better than most people who try it. She’s wicked smart and more talented than I could ever hope to be, she’s also just a genuinely kind and loving person (so loving that she would never, ever consider putting me in a cut rate nursing home when the time comes, right Lexi?!?).
The delusion was in thinking a quarter scale project would be “fun.” Guys, this shit is SO TINY!!!
I’m getting old, my eyes are going, I can’t see near or far anymore. I have arthritis in my hands, and I drop things constantly because my grip strength officially sucks. I had no idea how I was going to be able to work in this teeny, tiny scale. But, I needed a blog post for this week, and since all I’ve made recently are dead plants which I’ve already blogged about, I decided I might as well stop putting it off and jump in.
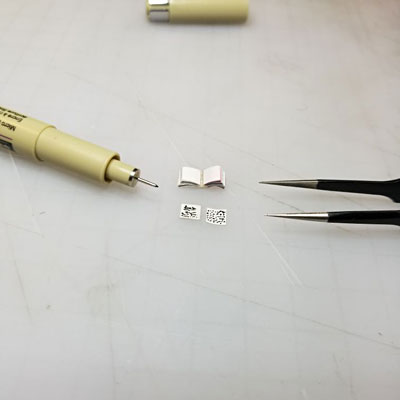
I thought that miniature books would be a good starting point. I’ve made a bunch, so I know how to do it, therefore I wouldn’t have to struggle with a new technique AND a tiny scale size. I’ve posted videos on my personal Instagram account on how I make books before, but in case you missed it I also uploaded that old video to the Sketchyville YouTube channel.
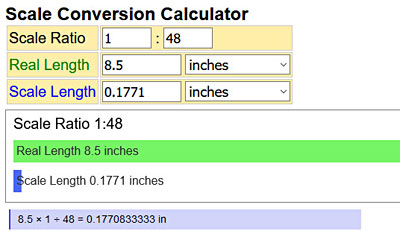
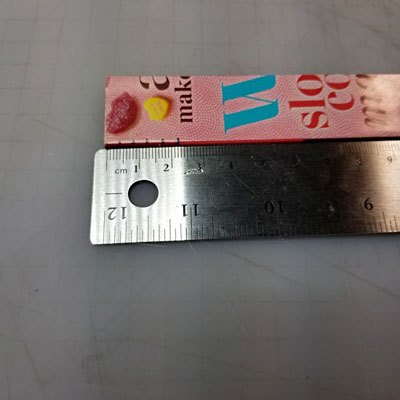
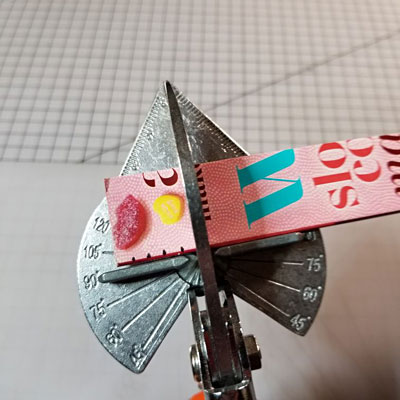
The first thing I did was measure one of my books in real life, so that I could figure out how big I needed to make the miniature version. It measured in at 8.5 inches. Now, I am not a mathy person, so I used a Scale Conversion website to do the calculations for me.
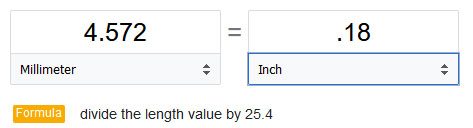
So that’s 0.1771 inches in scale. Tiny fractions of inches get really hard to measure though, so I popped over to Google (totally unnecessary step, I could have changed the scale output in the scale conversion) to convert imperial to metric.
To make things easier, I rounded up the imperial measurement to .18 inches, which gave me 4.5ish millimeters, which I rounded down to 4mm. (Why did I round? I have no idea; this is how my brain works so I just roll with it.)
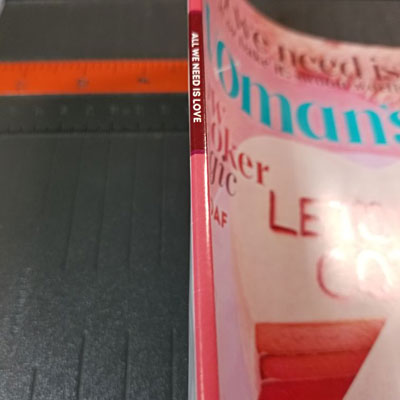
In the video I linked above, I mention that the magazine needs to have a glued spine. If it’s a stapled spine, it will just fall apart when you cut it. So check your spine and make sure there are no staples.
Cut your magazine lengthwise about an inch away from the spine. For my teeny tiny book, I don’t need it to be that wide, but it’s easier to work with the bigger size starting out, and I don’t plan on making a billion and six teeny tiny books, so I’ll save the leftover spine for other projects.
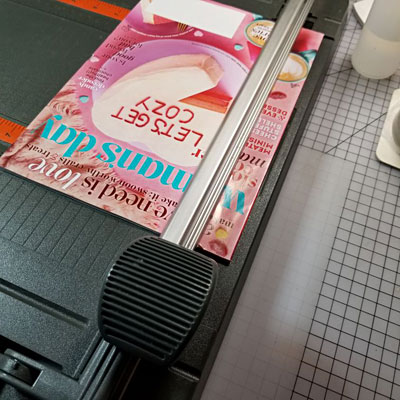
You can use an x-acto knife to cut your magazine, but I have the afore mentioned crappy hands, so I use a rotary paper cutter to do this.
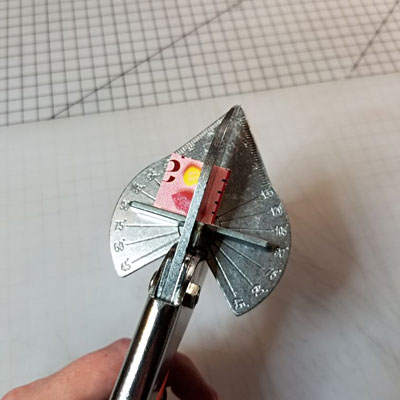
Once I had the spine cut, I marked it off in 4mm increments.
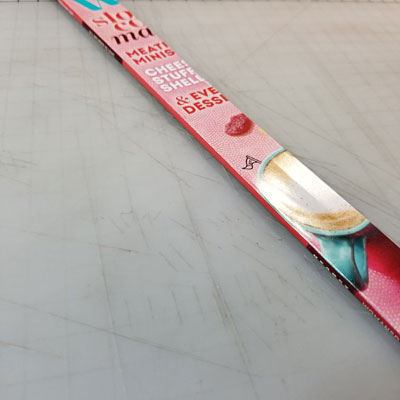
When I had the chunk of magazine spine that I was going to use for my books, I cut off the excess page material.
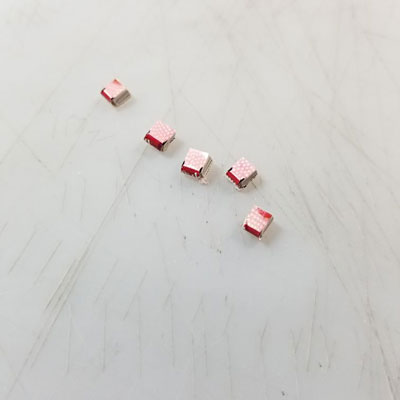
Finally, I cut the spine up into my book sized pieces.
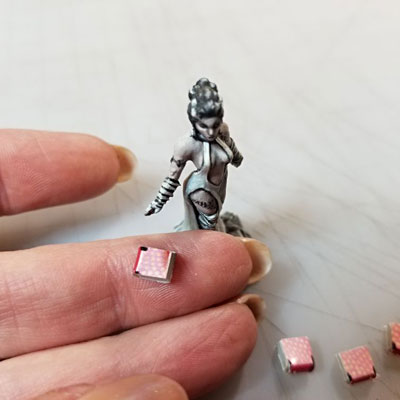
The thing about game miniatures, as you may already know, is they’re not actually quarter scale. Originally they were 1:64 scale, but manufacturers have kind of played loose with staying true to a standardized scale, and may have increased the size or just straight up developed their own scale for their lines. That’s why I wasn’t really concerned about my mathematical rounding earlier, because I’m not going for a religious 1:48 scale on this project, instead I’m just trying to make it fit the miniatures that Lexi’s painting.
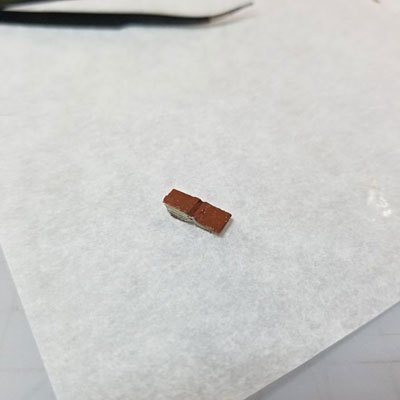
Lexi made me a Frankenstein’s Monsters mini for my birthday this year, so I used the Bride to make sure my scale isn’t way off.
The scale looked pretty good, so I started manipulating it into an open position, because this book is going to sit open on a table in the house. I did this by cracking the spine, and then rolling the pages outwards with my tweezers.
A couple of pages fell out when I broke the spine, and left a bit of a weird gap in the book. I used a 005 micron pen to draw tiny dots and scribbles to mimic writing, and then glued them back into the book with matte ModPodge to cover the gap.
I also coated the entire thing in ModPodge to glue all of the pages together, and cement the book into the open position.
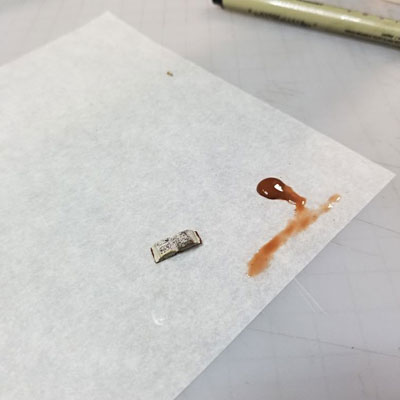
When the sealer was dry, I painted the back of the book with brown craft paint. It’s probably going to be glued into place in the finished project, but just in case it’s not, I didn’t want to leave it unfinished.
For an aging effect, I added a drop of water to the edge of the same brown paint I used for the book cover, and made a color wash that I painted over the books pages.
After the color wash had dried, I dry brushed a little taupe paint over the whole thing, to give it some dimension, and it was done.
All in all, it wasn’t as terrible as I thought it would be. I think the crafting gods were smiling on me though, because I only dropped it once (I thought I’d lost it and was going to have to start over, it was so small it looked like a scrap of paper on my floor). I’m glad I started with a technique I was familiar with though. As I get more comfortable working at this size, I’ll experiment more.
So that was my super long project post. I hope you enjoyed it, and if you make a mini book using this technique, be sure to tag us on Instagram @sketchyville.diy and/or share it to our Facebook page so we can see it!
We’ve all had ideas we thought were brilliant only to find once executed, it’s not at all what you expected. An epic fail to put it simply.
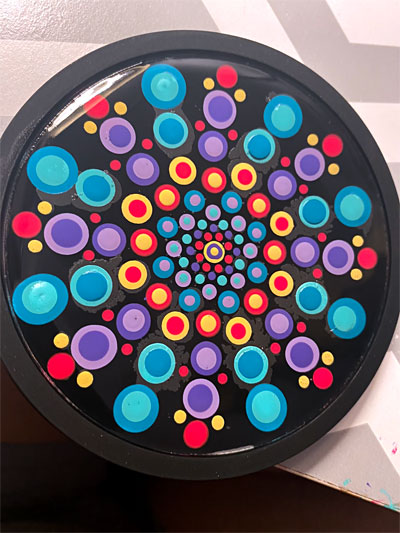
I purchased these silicone coasters that had a bit of a lip on it in hopes I could encapsulate my art with resin. I painted directly on the coaster after lightly buffing it so the paint and resin would lock in nicely.
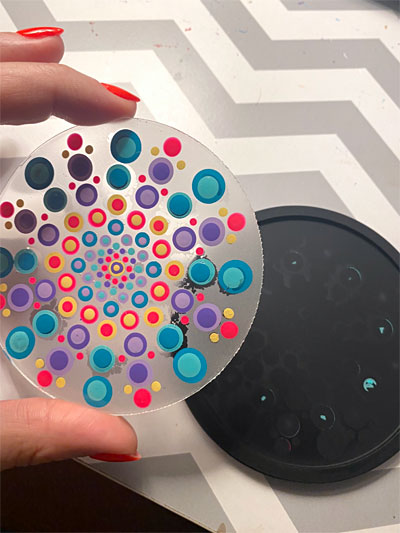
I gotta admit this project had me convinced in the first half because things were going so smoothly. I put the resin in, got any bubbles out and then set it in my LED/UV nail light. About 30 seconds in I noticed the coaster was curling up a bit on the edges. I took it out only to find not only was the actual coaster REALLY hot, but the resin was separating from the base. Whomp whomp.
Realizing your epic idea is a failure can be disappointing but in this case it ended up being kind of comical. After the resin was finished curing I was able to pop out a perfect disc of resin and my dot art (thankfully) came out with it.
I could drill a hole into the top and make it into an ornament of some sort or even just use it as a coaster itself. Either way, it’s never been used in the way I originally intended, and that’s ok. I hold onto this little disc of color as a reminder that even something “failed” can be beautiful.
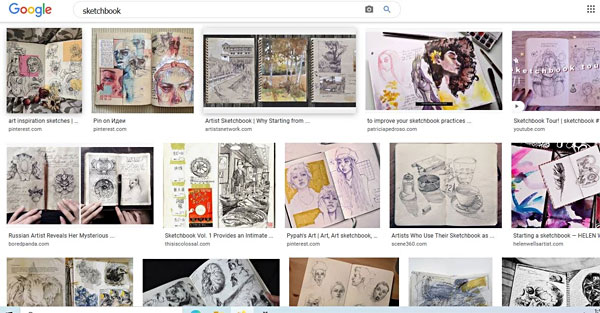
I think most people have seen some variation of the beautiful sketchbook. Just googling the word reveals dozens of gorgeous polished works of art compiled into a neat and tidy book.
Seriously these beautiful pictures are everywhere
Those kinds of sketchbooks are amazing, but I always found them intimidating. They weren’t something that meshed well with my workflow. I struggle keeping up with the nice pretty sketchbooks. I have a couple that I use for art challenges or requests that I know won’t become anything more than a social media post, but it is very rare that I even crack them open. It wasn’t until I took a digital illustration class that I found a way to use my sketchbook that really works for me.
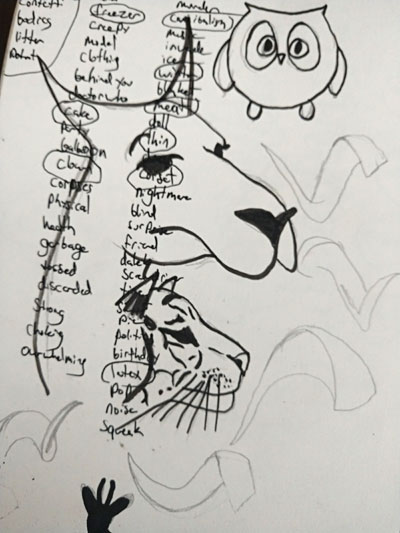
Instead of using something that is nice and clean, I use a very beat up mess of a book. The cover is worn from being shoved into bags and carried around from place to place. The contents are… well, they’re frankly disastrous.
Literally drawing over old notes
Inside are jumbles of chicken scrawl, hastily made mock ups of compositions, and experiments.
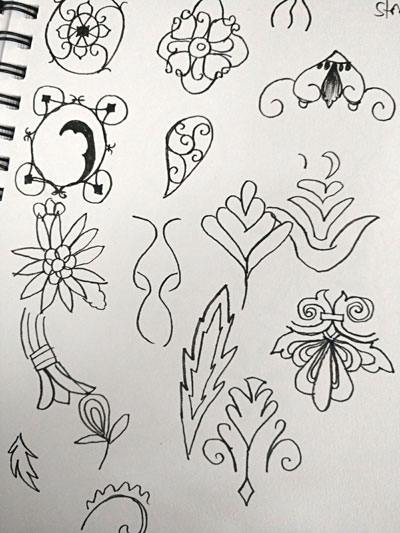
Playing with shapes and methods of coloring
My sketchbook is full of random things. I use it to plot out client work and refine layouts. New art tools get tested in the messy sketchbook. Most importantly, the messy sketchbook is a collection of ideas that I’m saving for later.
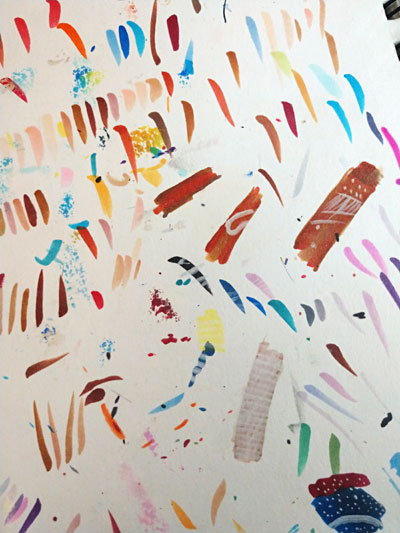
Marker tests
Ideas for a packaging redesign assignment
I often sit down with a desire to make something without knowing what it is I want to make. That’s when the messy sketchbook really helps me. In those moments, I can flip through and see all the ideas I’ve had in the past.
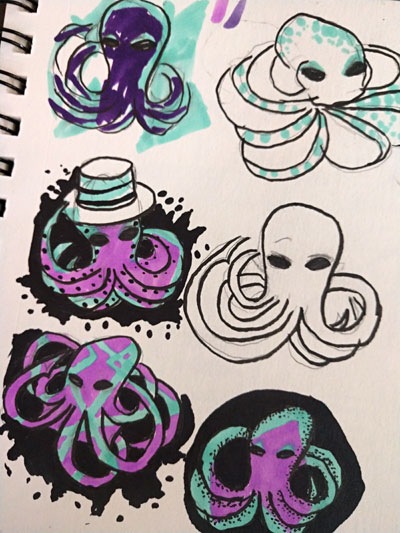
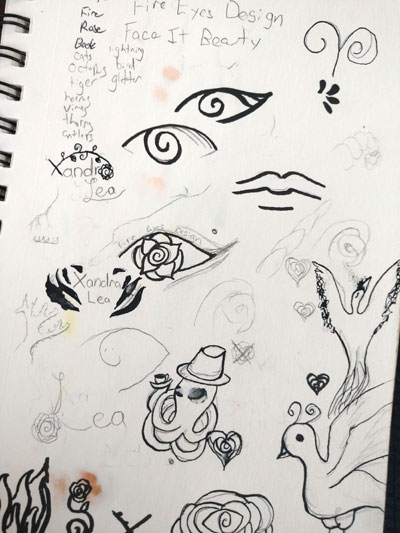
Thumbnails and notes when designing a logo for a class assignment (this is how my brand Fire Eyes Design came to be)
I can get inspired by my own doodles, or pick something I’ve drawn before and flesh it out into a full design or painting. The chaotic nature of my (almost nonexistent) layouts can encourage new associations between the images, leading to some very cool designs I never would have thought of before.
Sketches from a trip to the local museum
If you’re looking at doing something- anything- visual and creative, I highly recommend picking up a sketchbook. Make it ugly. Beat it up, fill it with scribbles and half formed ideas, and utterly abuse it. You might be surprised at how freeing it can be to be a bit messy, and you never know what you might be able to use later.