Blog

Trash is my Treasure

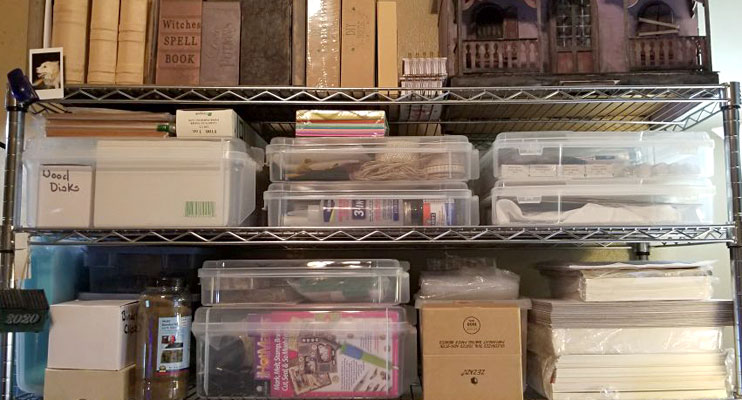
I was originally going to do a post on organizing my craft chaos. I’ve been slowly transforming my workspace into an efficient system where I can actually remember where I’ve stashed my supplies, and retrieve them easily. It’s a pipe dream, but organization soothes my anxiety addled brain, so I keep trying.

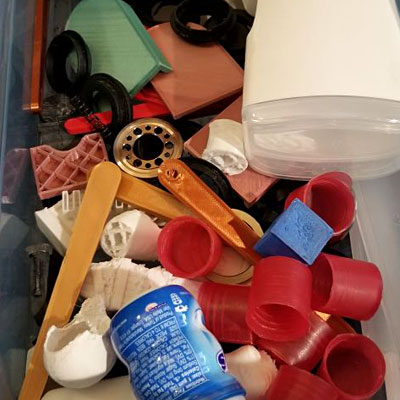
At one point, as I was sitting on the floor, surrounded by bits and bobs that I was trying to sort into bins, I realized that I was a dragon sitting on a hoard of literal garbage.

Now I don’t mean garbage in the figurative sense, as in something that I see value in when no one else does. I mean actual garbage, things that normal human beings would toss in the trash without a second thought.

On one side of me there was a stack of cereal boxes, cut into panels, on the other side a pile of foam packaging material. In front of me was a bin filled with gum containers, bottle caps, and other random plastic packaging.

Let me explain…

When we went into lockdown last year, we were still unsure of how the virus was transmitted. Having a couple of people in my house who are pretty high-risk when it comes to this virus, I limited bringing anything new into the house that wasn’t a necessity. So I had to limit my crafting supplies to things I already had on hand. The great thing about making dollhouse miniatures is that so many items we would normally throw away can be repurposed into crafting materials. It didn’t take long until everyone in the house was asking me if I wanted bits of trash before they threw anything in the garbage.

In the (likely) event you think I’m completely insane, let me show you an example of what can be done with a little garbage.

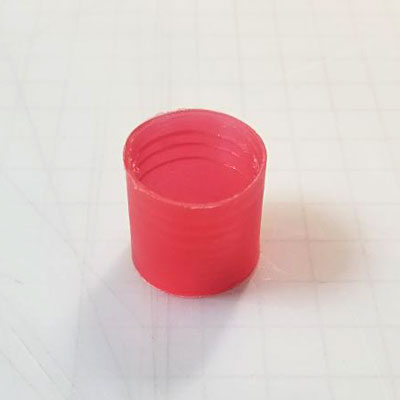
This is a cap off of a piece of electrical conduit. Its original purpose is to protect the threading on the ends of the pipe.

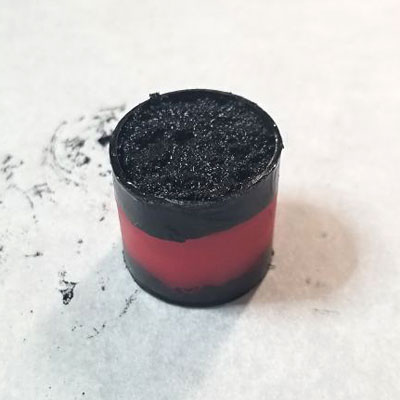
I threw a little black paint around the edges that would show once I covered the cap. I also filled the bottom two-thirds of it with a moldable plastic (you could use clay, or crumpled up tin-foil), just to fill it up so I didn’t have to make as much ‘dirt.’ I made the dirt by mixing some blended turf  with black paint and some glue, but I’ve heard that dried coffee grounds work for this as well, if you don’t have any turf on hand.

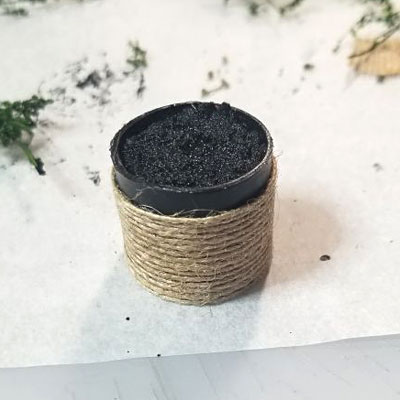
To make the pot look more like a pot, instead of a piece of discarded plastic, I glued a ribbon around it that mimicked rope or twine.  You can decorate it with string, yarn, ribbon, fabric, paper, or even sculpt something spectacular with clay. The sky is the limit, and you can really transform these pieces to look like anything you can envision!

Now, before I put up my final picture, I need to tell you that the dollhouse I’m working on is haunted and abandoned. I had some greenery that I was going to use to make a potted plant, but I realized that if I made a living plant I wouldn’t be able to use it in my house, because any plant left behind would be long dead.

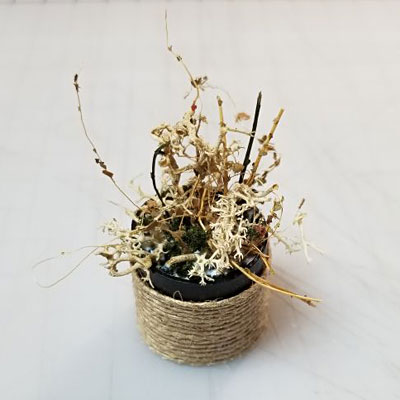
Unfortunately, I threw out the packaging for the foliage I used, so I can’t tell you what it was. If you search on Amazon for “Model Dry Foliage”  though, you’ll see a bunch of similar products that will work.

I spread some matte Mod Podge over my dirt to act as glue for the sticks and branches. I didn’t use actual glue, because I didn’t want the dirt to look too glossy when everything dried. No one has watered this plant in a long time, so wet dirt would look weird.

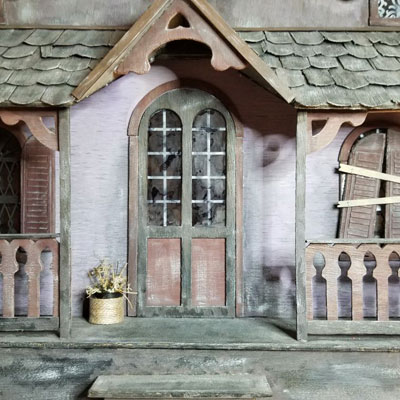
Here it is on the porch of my house. I haven’t aged it yet, because I’m not sure where it’s going to live and I like to age my pieces when I put them in place so that everything looks cohesive, so it still looks a little ‘new’ for the setting. You can see the size though, and how it will fit in with my house in the future.

Now start saving your own trash, it’s much better living in a dollhouse than it is in a landfill! And if you’ve been inspired to make something out of repurposed garbage, be sure to show us on the Facebook page, or tag us @sketchyville.diy on Instagram! We’d love to see what you’re making!

*This post contains Amazon Affiliate links

Covid Made Me Do It

Hey all, Neeley here! I thought for my first blog post I would dive into why I’m here and how my part of Sketchyville came to be.

Picture it, Pandemic, March 2020... (10 points if you got the Golden Girls reference), we were all thrown into a “new normal”. Personally, my new normal consisted of A LOT of alone time and booze. By nature I’m an introvert but even for me the alone time got to be pretty anxiety inducing. Needing to find a purpose was crucial for me and thankfully I ended up finding that in “arting” as my two year old niece calls it.

I had pinned a few things on my Pinterest of dot mandalas over the years because I always thought they were mesmerizing. However, me being me and having self-doubt I didn’t think I could ever do them. A few vodka/sodas later I found myself online buying paint, dotting tools and mini canvases.

Within two or three days thanks to the convenience of Amazon Prime I had the goods and was ready to try. Looking back at some of my first pieces makes me smile because I really thought I did a good job for my first few tries. Not that they were bad, but I’ve improved so much and thanks to covid I had the time to really practice.

As you can see by some of my pictures I’ve attached, practice really does make (not totally) perfect. I would simply google dot mandala’s or look on Pinterest for designs to follow until I built the confidence to use my own color theory and creativity to whip up my own design.

The most important part of this journey for me though was the peace doing this art brought me. I’m a neurotic, anxious person who is constantly thinking about 7 million different things at once. When I dove into a new mandala it was like the world got quiet and all that needed my attention was each individual dot I placed, nothing else. At the end of the day that’s really all that matters, if it brings you joy. Whether you’re a newbie or an expert, it’s about how it makes you feel.

Don't Fear the Dremel pt2 - The Cursed Chair

Full disclosure, I had fully intended to upload the finished pictures of this chair a week ago, but it has been a struggle. The chair decided it was going to defy all attempts at gluing it together, so that took me way longer than it should have...

Then:

  • We had some issues with a rental property we own
  • One of the leaders of the country I live in attempted a Coup d'état
  • I got a dental abscess, which I noticed when my tooth developed its own heartbeat

And then... the absolute worst...
I had to say goodbye to this girl:

Her name was Anyu, which means "snow." We got her during the great Snow-pocalypse of 2011, and she burrowed tunnels through the drifts. She was neurotic and hated people, so essentially she was my spirit animal. She loved her family though, and we loved her.

Suffice it to say, it's been a rough couple of weeks.


The last time we talked, I had just used the dremel to carve an ass groove into the seat of a miniature chair. Once I actually got the chair to stay glued together, I coated it with black paint, and then again with brown.

Once painted, it's so much easier to see the contours of the groove that I dremeled in. It's also a lot easier to see that I forgot to do a finishing sand before painting. *oops*

So I sanded it with a 400 grit piece of sand paper to smooth the matboard down, and get rid of any ridges that the dremel's sanding band had left behind.

The seat still had a bit of a rough texture that wouldn't be present on a well used, full sized chair, so to completely smooth it out I coated it with a layer of Triple Thick Sealer. This super thick sealer self levels, and fills in any remaining roughness left after sanding.

Once the sealer dried, and after another light sanding, the seat was pretty smooth. I put another coat of dark brown paint over it, to finish it off, and promptly realized I hated it.

          This is my life, my method of crafting it seems:
          I make something.
          I screw it up at least three times, and decide I hate it.
          Then I figure out how to alter it so I don't hate it anymore.

The problem with the chair was that it was lumpy from my multiple gluing mishaps. The diorama it belongs in is a basement scene, so it's supposed to look old and discarded, but this chair literally looked like trash.

So I channeled the late, great Bob Ross, and threw some paint at that sucker.


See the ass grooves?!?

I gave it another coat of a lighter beige paint, did a brown wash over the whole thing, dabbed some crackle effects in areas, and washed it again with black. I added some Matte ModPodge to give it a slight sheen, and decided it was perfect.

The lighter paint color and washes turned the glue lumps into dirt and scars from a life well lived. Now it looks like a discarded chair you'd find in an old basement.

So the moral of the story is, don't give up, even if you hate it. Just throw some paint at that sucker.

Maybe I'll try that with this new year, we're less than 2 weeks in and I'm already over it.


*This post contains Amazon Affiliate links

Lemon Drop Martini

Are you 21? No? Then skip this post, come back tomorrow or something. Don't get me in trouble with the FCC. I'm already half crazy being locked up in quarantine, you don't wanna risk me at full crazy.


I realized that for all of our webpage snark about us being borderline alcoholics, there's nothing in the blog about it yet. So here goes...

One of the worst parts of isolation, for me, was not being able to pop into the bar next to the salon after work to get a well mixed cocktail. I'm a crap bartender, most of my mixed drinks taste like straight alcohol. I don't drink beer, and wine is a mixed bag for me; sometimes it goes down great, other times I get a migraine and three days of dry heaves.

The bars in our state were told they would have to shut down on St. Patrick's day. The were given notice in the morning that they would only be allowed to remain open for that day, and they couldn't re-open until further notice. So, being the awesome, supportive business neighbors we are, we made sure to pop on over and bear witness to their closing. Drinks were freely flowing, much money was spent, tears were shed, and dinners were lost.

The next day, a horrible realization invaded my hangover... I was going to have to learn how to make my own drinks! *gasp*  

The first drink I learned how to make is one of my recent favorites, and I'm going to share it with you:

Lemon Drop Cocktail
Ingredients:
          2 oz Vodka
          1/2 oz Triple Sec
          1oz Simple Syrup
          1oz Lemon Juice

Directions:
          Fill a cocktail shaker (or Tupperware container with a matching lid) with ice. Pour ingredients over ice, put lid on, and shake well. Strain into a martini glass (bonus points if you sugar the rim).


This is a super simple cocktail to make, and it gets especially high marks for being made up of things most people have in their stash. It also has a pretty wide margin for error. If you don't get it quite right, it will still be tasty!

Hope you enjoyed our first booze post. If you try making your own Lemon Drop, drop us a message on Facebook or Instagram to let me know how it goes!

Enjoy,


Don't Fear the Dremel

Hello dear, deranged citizens of Sketchyville,

I was stood up for my zoom cocktail gathering this evening, so I find myself with no concrete plan for something to do. I should be editing the next 2020 Room Box video for the YouTube channel, but video editing makes my eyes cross, so I got about 30 seconds in and decided it was a project for future Anne.

Instead, I've been dabbling with making a miniature desk chair for a Harry Dresden book box I'm working on (pics here and here), and I got to thinking about something someone said at an online event I attended a few days ago.

She said she has a Dremel, but that she's afraid to use it. *gasp!!*

Now don't get me wrong, I have a healthy fear of most power tools. I have a mini circular saw that makes me pee myself a little each time I fire it up. I can't afford another finger reattachment surgery. As a nail tech though (we call them e-files), I can honestly tell you that you have no reason to fear a Dremel.

A few tips for you noobs to help you conquer your fear:

  1. Wear safety glasses. The biggest threat a Dremel poses to your person, is throwing something into your eyeball.
  2. Start off using the lowest speed available. Only turn it up if it's not getting the job done.
  3. Don't use the cutting wheels. Dremels cut like crap, get an EZ Cutter instead.
  4. Diamond and stone bits, along with sanding bands, are a must for crafters.

Now back to the reason I got to thinking about Dremels...

Here's the source image that I'm modeling my chair off of:

The seat has an ass groove, and so to replicate that groove in miniature I used two layers of a cheap matboard called "backer board" (it has a chipboard core) to create the seat, and then carved it out using my Dremel.

First I used a sanding band to carve some leg grooves into the edge of the seat.

Then I used the same sanding band to start shaping the leg grooves into the ass groove.

I then switched to a stone bit to finish the ass groove, and smooth any ridges left by the sanding band.

It's hard to see the full effect, because it isn't painted yet, but I've used this technique a few times, and it really makes great looking wooden type chairs.

I promise I'll post when the chair is finished, and throw a link up here so you can see the full effect.

So don't fear the Dremel. It's an easy tool to get the hang of, and it can do so many things that will make your life so much easier. Try it out, and show us what you made on our Facebook page. You can also ask us questions there or on Instagram, we'd love to hear from you!


*This post contains Amazon Affiliate links


Anne's Crafts

Anne is our jack of all trades; if it's a craft, she's probably tried it. Check out some of her more recent projects!


Neeley's Mandalas

We're all a little self-critical, but Neeley really has it perfected. She's a fantastic artist, with an amazing eye for color, and she has absolutely no idea how good she is at this. Take a look at some of her work so far!


Lexi's Work

Lexi is our resident artist. She's won national nail art competitions, and paints tiny game miniatures for fun. Take a look at some of her work so far!


< 1 2 3 4 5 6 >